January 2017 - Dash & Console Removal
click images to enlarge
Under Dash Panels & Console
 To remove the dash, I've discovered it is best to remove the under dash panels and center console first. Actually the process for which I share is complete disassembly beyond simply upper dash removal. The under dash panels have to come out for the upper dash because there are upward pointing screws securing the upper dash from below. Under dash panels and console - I've done this plenty of times on BMW 2002s (both with A/C units and not). Not too hard. Fumbling blind with this 66 e120 (there aren't really many resources out there - correction there are NO RESOURCES out there), my initial assumption that it wouldn't be too far removed from a 2002 proved to very ... well.. WRONG. My new found rule of thumb as I stumble along with this 2000 C, is that for every 1 piece found on a 2002, the 2000 C seems to have 5 - 10 pieces. The nice thing about the e120 coupé is that it is meticulously assembled. Each component is well made. The 2002s parts seem cheaper (the final years of the 2002 some components seem cheapy crappy). Not to insult the beloved 2002, maybe better stated the 2000C component involved more detail and finish.
Coolaire Retro
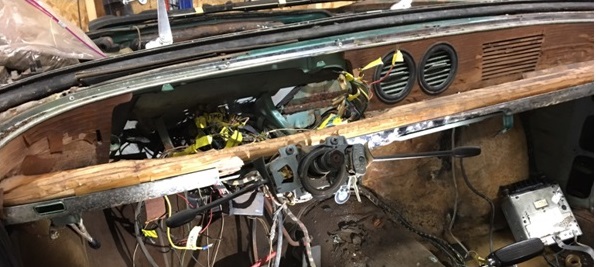
 One interesting item I discovered in the car is the box with the knob to the left. Coolaire (Miami). With a little research I discovered that the Coolaire company of Miami was the choice for after market air conditioning for luxury imports arranged by US importers and dealers in the mid-1960s. Air conditioning was extremely rare on European cars in the early to mid 60s. Importers and US dealers like Hoffman didn't really start doing their own A/C conversions until the early 70s. The go-to source in the mid 60s was Coolaire of Miami. Note the "Hi-way" and "City" settings. State of the art! The odd thing, I can't find any compressor or cooling unit anywhere on the car. There is a big section cut out of the rear hat deck metal (underneath the greenhouse rear window) now oddly vacant. I'm wondering if the cooling unit was placed back there? This was an Arizona car that made its way to the industrial northeast and I can only assume it was removed. Luckily for the car, its automatic transmission most likely gave out saving the car from the rust belt roads and a guaranteed death.
Steering Wheel
 Remove the steering wheel (19mm nut), and the steering column shrouds. The shrouds are held together with bolts rising through cast bottom piece into upper piece (just like a 2002). The e120s have a wooden top piece (nifty/crafty/cool). Next remove the under dash panels. There are two on the left (like a 2002) and one in the center above the console, and finally one next to the glove box.
Remove glove box and duct hoses underneath on both sides. Actually the glove box sort of fell out. Broken off at the rear hinge.
Center Console Top
This is an automatic which is more complex compared to the standard trans cars. It has the long ornate console running between the seats. First step is to remove the console top. This required lots of time and detective work to find a myriad of hidden screws. Most were revealed by pulling out the rear electric windows switch panel and the radio facade.
Remove the console. Much like the console top, there are numerous somewhat concealed screws. The other issue with removing the console is that I could not pull the vent lever knobs off and thus opted to remove the center console from around the upper console facade. I did prep the radio for removal keeping it connected to its speaker wires to the dash speaker. The radio and speaker are original to the car. The automatic shift lever unit is bolted on to the trans tunnel over the standard shift port with the 3 bolts (13mm) under the carpet.
 |
 |
 |
 |
Heater-Blower-Fan
Remove the heater-blower-fan box with cables attached to the upper console facade. Also detach all wiring to the upper console knobs. The heater-blower-fan box is secured with 4 nuts (13mm) and will drop out with some gentle push from the engine compartment side. Unlike the 2002, the e120s do not have a shield metal shroud above the fan unit.
 |
 |
 |

Upper Dash
 This phase follows the removal of the under dash panels and center console. The main reason being that there are some long screws that project upward from underneath into the upper dash. One note. Removing the dash on both a BMW 2000 c (e120) and a BMW e9 such as the 3.0cs requires removing the windshield. This is because the dash pad needs to be lifted upward enough due to push pegs used to secure it.
I started by removing the dash pad and cluster hood. There are both horizontal threaded shafts for the hood as well as vertical long screws. The dash pad as runs across the width of the car is held in place via a series of metal spring clips.
Instruments and Cluster Facade
The next step is to remove the instruments and cluster. This can be accomplished by reach up from underneath. You will find that each gauge actually its own pair of "gnurled" plastic nuts that hold each in place.
You will also need to come up from underneath with your trusty 10mm wrench to release the nuts that hold the cluster façade in place. Having a gauge removed allows you to actually see what you are doing.
Remove the cluster façade with gauges in place namely so you will have access to identify each wire and how it attaches to the each gauge. This is not a BMW 2002 that's for sure. I was surprised at how many wires were feeding the gauges.
 |
 |
 |
 |
 |
 |
 Decorative Chrome Façade
Remove the chrome strips on the driver's and passenger side. This is executed by removing screws from beneath. This is done in part because these screws also hold the wooden main dash in place.
 Upper Strip Screws
Remove the screws that hold the dash in place at the top.
 Main Lower Bolts
The dash is held in place by 4 main bolts that enter the wooden dash with carefully engineered threaded female ports. One sure sign of a failing dash is if these steel insert break free due to wood deterioration.
Dash Speaker
 The dash speaker needs to be removed because it too is securing the wooden dash in place. I kept the speaker wire connected to the radio.
 That is pretty much a wrap. Unfortunately for this dash, the water damage has been rather severe. It usually is the corners that get it the worst. Even for the unsuspecting, the rubber windshield gasket can be compromised enough without you even knowing it.
